
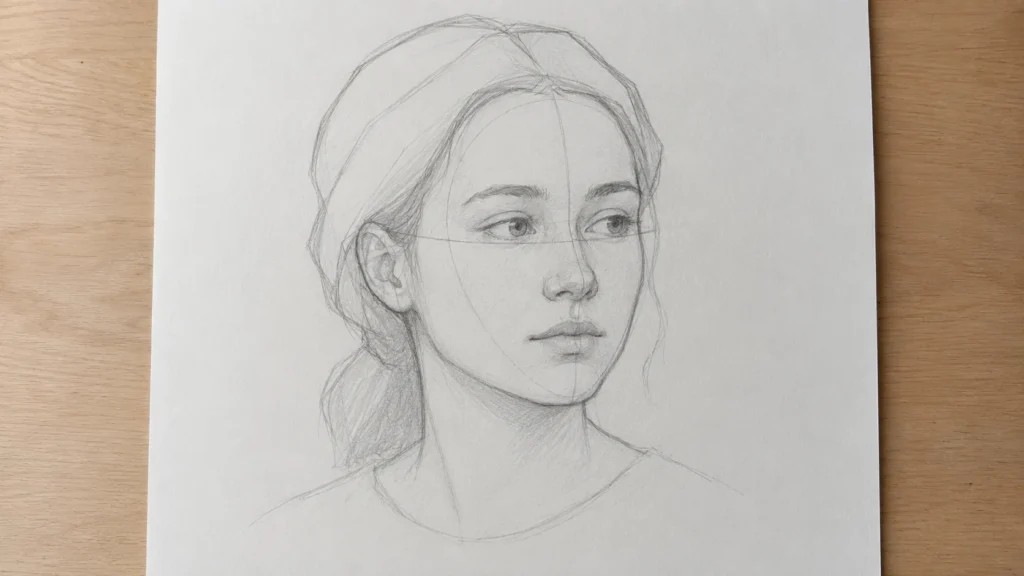
Start with a circle rather than an oval so this construction keeps the cranium separate from the jaw. Cut the circle with a jawline, then place the features on guides you drew before you drew a single eye. This is a method for drawing a girl in three quarter view, plus the small adjustments that change age, hair and expression without changing the method.
This is the portrait guide in our drawing series. It focuses on the head, the face and hair. If you want the whole standing figure and how tall to make it, that is how to draw a human, which covers proportion from head to feet. For short warm up subjects, the easy drawing ideas hub has a list.
One Link for Your Sketchbook
A short address you control, pointing to your drawings, your pages and everything else you share.
Start With a Circle, Not an Oval
A human skull is round at the top and back. The face is a comparatively flat plate stuck to the front of that ball, and the jaw hangs below it. When you start with an oval, you have already flattened the skull into a shape that cannot turn, cannot tilt and cannot be seen from any angle except dead on.
Start with a circle instead and the head becomes a solid object. You can rotate it. You can tip it. The features follow the curve of the guides because the guides curve around a ball, which is what makes a three quarter view read as a face turned in space rather than a flat face with the eyes shoved to one side.
Everything here is drawn light. The circle, the cut, the cross: all of it is scaffolding and all of it comes off at the end.
Step 1: The Circle and the Cut
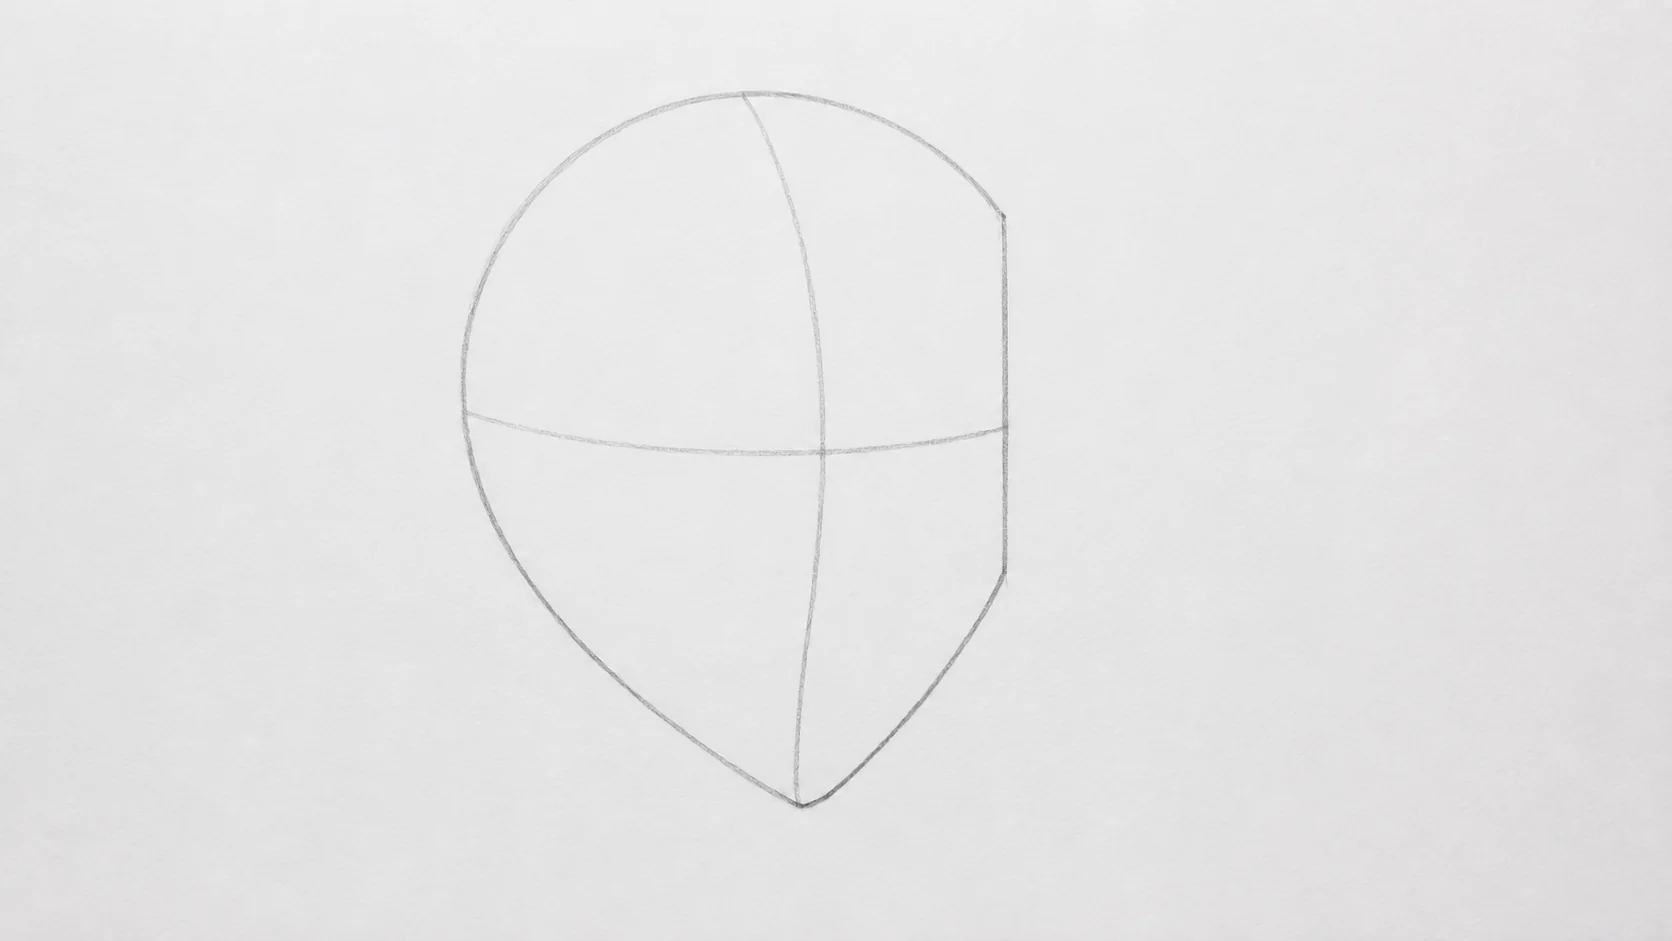
Draw a circle. It does not need to be perfect, and drawing it in one confident motion beats drawing it slowly in six nervous arcs.
Now slice a piece off one side, a flat vertical cut about a quarter of the way in. That flat is the side plane of the head, the part above the ear where the skull narrows. Cut the left side and your girl faces slightly right; cut the right side and she faces left.
That single cut is what makes this a three quarter view instead of a front view, and three quarter is the angle this guide uses because the guides show the head turned in space.
Step 2: The Jaw and Chin
From the bottom of the flat cut, draw a line angling down and forward to a point below the circle. That point is the chin. Then curve a line from the chin back up to the bottom of the circle on the other side. You now have a rounded shield shape hanging under the ball.
Two calibrations decide the age and the character:
- How far below the circle the chin sits. Closer to the circle reads younger and rounder. Further down reads older and longer.
- How sharp the corner of the jaw is. A soft, barely there corner reads young and feminine in this stylization. A defined angular corner reads older and stronger.
For the young feminine figure this guide draws, keep the chin fairly close under the circle and the jaw corner soft but present. A chin that is too pointed reads as a mask in this construction; soften it.
Step 3: The Cross That Decides Everything
Two lines, and they must curve.
The vertical centre line runs from the top of the circle down through the chin. In three quarter view it is not straight down the middle; it bows toward the side the face is turned to, like a line drawn on a ball. Everything symmetrical in the face hangs off this line: the nose, the mouth, the gap between the eyes.
The horizontal eye line crosses it at the vertical midpoint of the whole head, chin to crown. Not the midpoint of the circle. Measure the full head including the jaw, then halve it. This line also curves, wrapping around the ball, dipping slightly on the far side.
The eye line landing at the true midpoint is the check to make first. Eyes drawn too high leave a shallow forehead and a huge chin.
Step 4: Eyes on the Middle Line
Place five equal units across the eye line, from one side of the head to the other. Eye, gap, eye, and a margin at each edge. In other words the space between the eyes is about one eye wide, and there is roughly one eye of space outside each eye.
In three quarter view that spacing compresses on the far side. The far eye sits closer to the edge of the face and is narrower, because you are seeing it at an angle. Draw it slightly smaller and slightly squeezed. Keeping both eyes identical is what flattens a turned head back into a front view.
Shape matters more than detail. An eye is not an almond floating in space: it has an upper lid that is heavier and casts a small shadow, and a lower lid that is a lighter line. For a feminine reading, thicken the upper lash line and leave the lower one delicate. Add one small circle of white left unshaded in each iris and place it in the same spot in both eyes; light comes from one direction, and matching highlights are what make eyes look wet and alive.
Keep the Whole Sketchbook Behind One Link
Your studies, your finished pieces and everything else you share, at one short address.
Step 5: Nose and Mouth by Thirds
Take the distance from the eye line down to the chin and divide it in three.
- The bottom of the nose sits at the first third mark.
- The mouth sits a little above the second third mark, closer to the nose than to the chin.
Both sit on the curved centre line, so in three quarter view both shift toward the turned side along with it.
Keep the nose light. A nose drawn with a hard outline all the way around reads as a beak. In this guide, treat it as one of the main shapes in the face design. Two small nostril marks and one soft line for the shadow under the tip is usually enough. The mouth is the same restraint: the line where the lips meet is the darkest thing, the outer edges of the lips are barely drawn at all.
The corners of the mouth roughly line up under the inner edge of each eye. That check catches a mouth drawn too wide.
Step 6: Ears, Measured From the Eye Line
Ears run from the eye line down to the bottom of the nose. Use the eye-line-to-nose-base check when placing the ears.
In three quarter view you see one ear clearly and the other is hidden or barely visible past the cheek. The visible ear sits at the back of the flat cut you made in step one. If hair will cover the ears anyway, still mark where they go: it keeps the hair sitting at the right height.
Step 7: Hair Grows From a Line, Not From the Skull
Hair is the part to check most carefully. The mistake to avoid: hair drawn as a flat outline glued to the edge of the head, strand by strand.
Three fixes, in order of importance.
Draw the hairline first. It starts high on the forehead, roughly one third of the way up from the eye line to the top of the skull, and curves back toward the ears. Hair grows from that line, not from the outer edge of your circle.
Give the hair volume above the skull. The silhouette of the hair must sit noticeably outside the circle you drew, because hair has thickness. Hair drawn exactly on the skull line reads as a swimming cap.
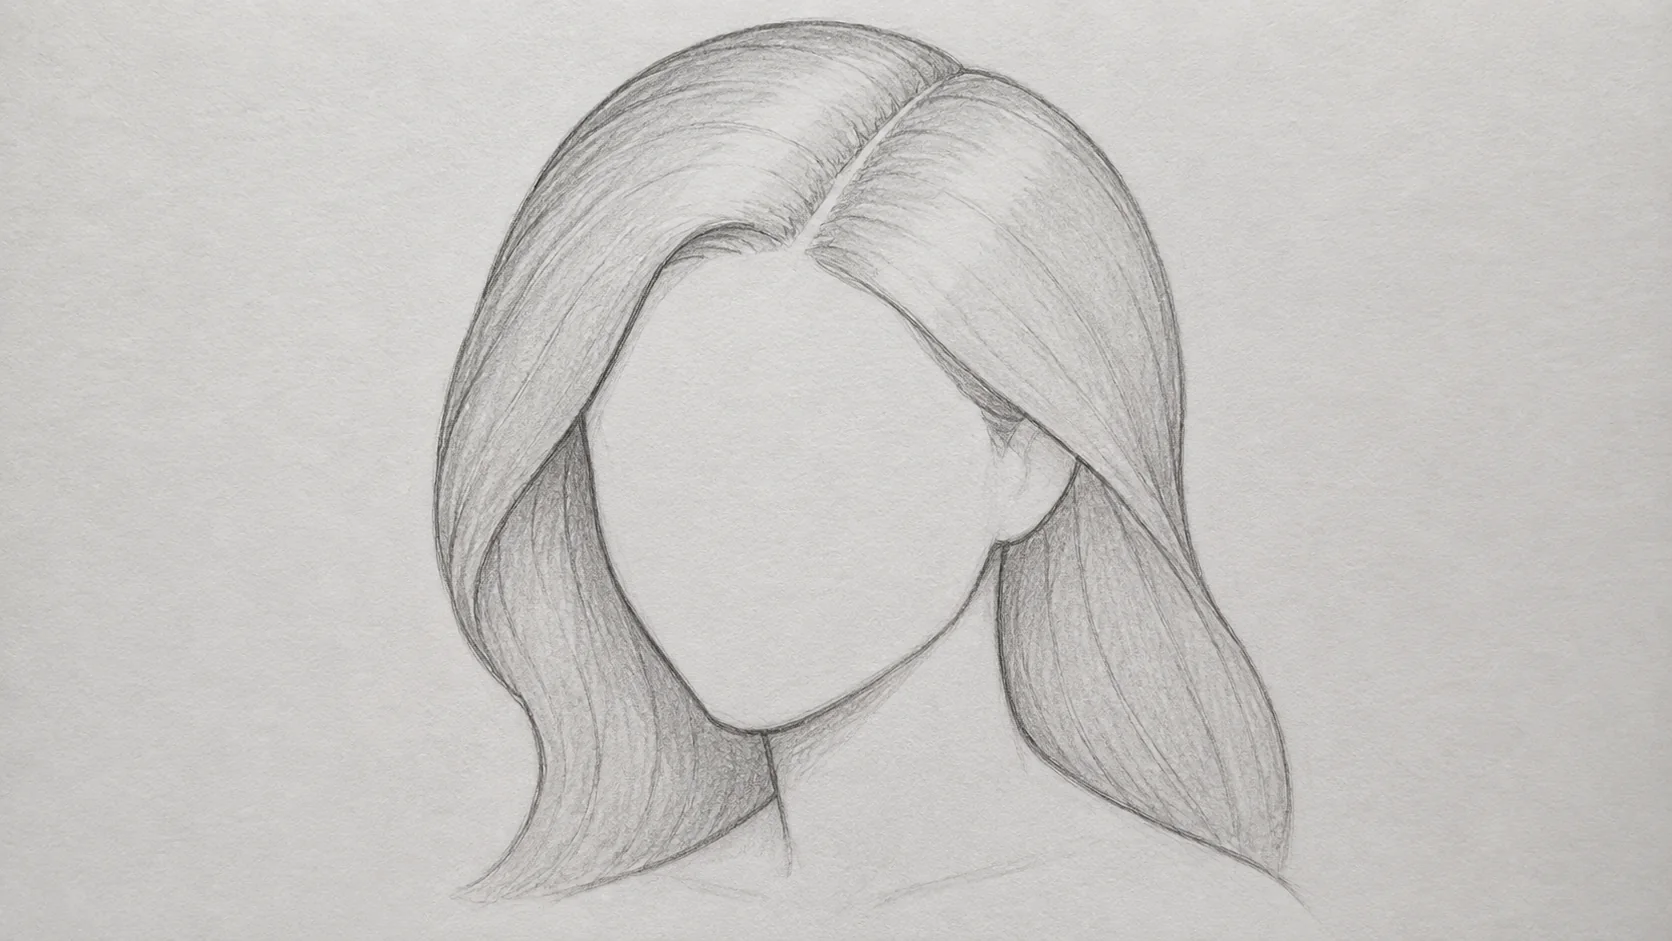
Work in masses, not strands. Block in three or four big shapes first: the part, the sweep on each side, whatever falls behind the shoulder. Only inside those masses do you draw individual lines, and only a few, following the direction the mass travels. A hundred evenly spaced parallel strands read as wire.
Leave a light area where the light hits the curve of the head. That unshaded band is what gives the hair its form in this method.
Step 8: Neck and Shoulders So the Head Is Not Floating
In this construction, draw the neck at roughly the width of the space between the outer corners of the eyes, and treat it as a cylinder rather than two parallel lines.
It does not rise straight out of the shoulders either. It angles slightly forward. Two lines from the base of the skull down and forward, then flare them out into the trapezius, the slope that runs from neck to shoulder. That slope is what makes a portrait sit on a body instead of balancing on a stick.
Even if you are only drawing the head, put in the neck and a suggestion of both shoulders. A head cropped at the jaw floats.
Step 9: Commit and Clean
Press harder and draw the real lines now: the jaw, the features, the hair masses. Vary the pressure. A line that is dark under the chin and light along the top of the forehead already suggests light and roundness before you shade anything.
Then erase the construction. The circle, the cut, the cross, the thirds. If a guide line is hard to remove, you drew it too heavily, which is feedback for next time.
Optional last pass: one soft shadow under the chin, one along the far side of the nose, one under the lower lip. Three shadows and the face turns solid. More than that, at this stage, turns it muddy.
Change the Age Without Changing the Method
Same construction, different numbers:
| Reads as | Eye line | Eyes | Chin and jaw |
|---|---|---|---|
| Small child | slightly below the midpoint | large, round, wide apart | very short, fully rounded |
| Teenager | at the midpoint | large, soft lids | short, soft corner |
| Young woman | at the midpoint | defined upper lash line | defined but not sharp |
| Older adult | at the midpoint | heavier lids, less white | longer, more angular |
Notice the eye line barely moves after childhood. Age is carried by the jaw, the lids and the softness of the edges, not by relocating the features.
Seven Mistakes That Make a Face Look Wrong
| What went wrong | The fix |
|---|---|
| Eyes too high on the head | Eye line goes at the midpoint of the whole head, chin to crown |
| Head is flat, will not turn | Start from a circle with one side cut, not an oval |
| Both eyes identical in a turned head | Narrow the far eye and push it toward the edge |
| Hair looks like a helmet | Draw the hairline first; give the hair volume outside the skull |
| Chin too pointed | Soften the point; a pin sharp chin reads as a mask |
| Mouth too wide | Corners line up under the inner edge of the eyes |
| Head floats above the body | Add a cylinder neck angled forward, plus shoulder slope |
Show the Portraits You Are Proud Of
One VisuLink holds your sketchbook, your pages and everything else you share.
FAQ
Where do the eyes go when drawing a face?
On a horizontal line at the vertical midpoint of the whole head, measured from the chin to the top of the skull, not the middle of the circle you started with. Placing them higher is the error to fix first, because it produces a shallow forehead with an oversized chin.
Why should I start with a circle instead of an oval?
Because a skull is a ball with a face plate on the front and a jaw hanging below. An oval is already flattened, so it cannot be rotated or tilted convincingly. Starting from a circle with one side cut flat lets you draw the head from an angle and keeps the feature guides curving around a solid form.
How do I draw hair that does not look like a helmet?
Three things. Draw the hairline on the forehead before the hair. Let the hair silhouette sit clearly outside the skull circle so it has thickness. Block hair in as three or four large masses and draw only a few direction lines inside each, instead of many evenly spaced strands.
How far apart should the eyes be?
About one eye width apart, with roughly one eye of space outside each eye, so the eye line divides into about five units across. In a three quarter view the far side compresses, so the far eye gets narrower and sits closer to the edge of the face.
How do I make a drawn face look younger or older?
Change the jaw and the lids, not the position of the eyes. Younger reads as a shorter, rounder chin, a softer jaw corner and larger eyes with lighter lids. Older reads as a longer, more angular jaw and heavier lids. The eye line stays at the midpoint of the head throughout.
Do I need to draw the neck if I am only drawing the head?
Yes, at least a suggestion of it. A head cropped at the jaw looks like it is floating. Draw the neck as a cylinder angled slightly forward and add the slope out to both shoulders, even lightly.