

Every Thanksgiving craft on this list is made with your hands, a pair of scissors, a needle and things you can gather or already own. No cutting machine, no printer, no template files. Pressed leaves, dried corn, branches, burlap, kraft paper, twine, beeswax and jars you were going to recycle.
The twelve projects are grouped by where they end up: on the table, in the middle of it, at the door, and on the mantel. Each one lists generic materials, a difficulty rating from this guide, a time estimate, and complete steps. Gathering comes first, because pressed leaves and dried branches are the raw stock for half the list and need a head start.
One Link for the Whole Table
A short address you control, holding the photos of what you made, the materials list and the notes you want to hand to whoever hosts next year.
How to Choose One
Choose by what you have and how long you have. With dry materials, everything except the lanterns and the wax garland is a single session. If you want guests to take part, the gratitude tree and the paper runner give them something to write on during the meal.
Gathering and Preparing Natural Materials
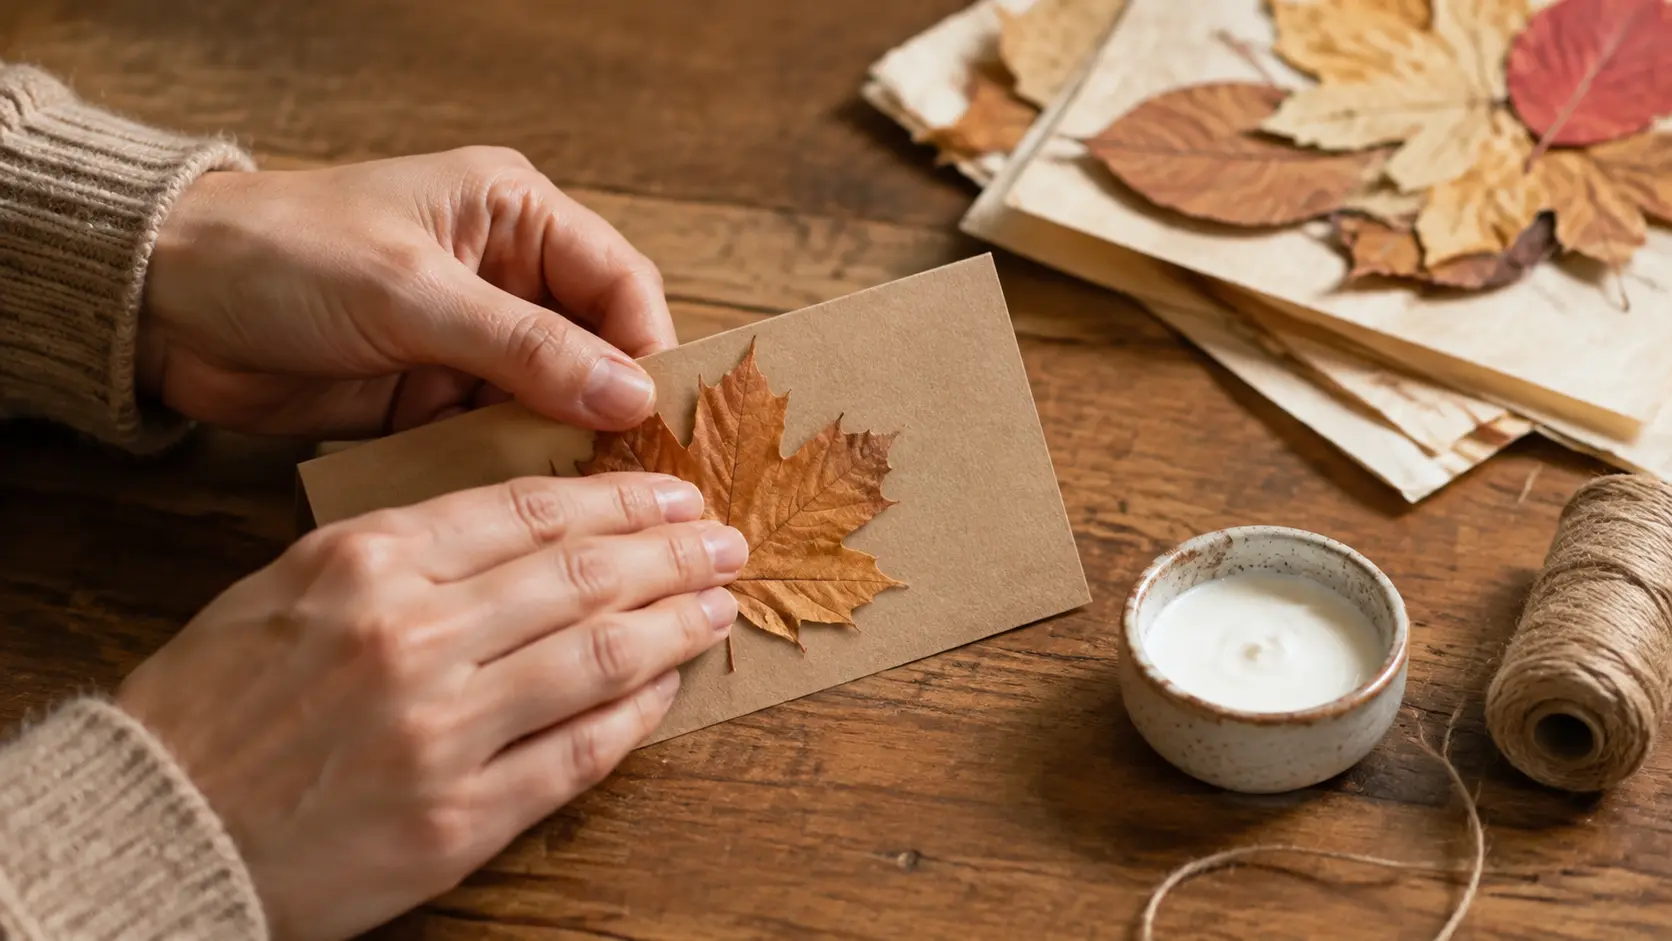
Pressing leaves. Collect leaves that are fully coloured but still flexible, with no holes or mould. Lay each flat between two sheets of plain paper, stack the sheets inside a heavy book, and weight the top with more books. Leave them until dry and papery, checking after a week and changing damp paper. Store them between paper and handle them by the stem, because a pressed leaf is brittle.
Dried corn and husks. Ornamental corn is sold already dried, husks attached, wherever pumpkins and gourds are sold in autumn. Keep it dry and out of direct sun. For the napkin ties, pull the husks off the cob and soak them a few minutes in warm water so they bend without splitting, then pat dry.
Branches. Fallen or pruned branches with an interesting shape, left indoors to dry for a week or two, because green wood shrinks and can crack. Strip loose bark by hand and cut to length with secateurs.
Dried grasses, pine cones and beeswax. Cut grasses on a dry day and hang them upside down in an airy room until the stems are stiff. Pine cones from outdoors go on a tray in a low oven for a short while to open and dry out; stay in the kitchen while they are in. Beeswax, sold in blocks or pellets, is melted only in a heatproof bowl over simmering water, never in a pan on the flame.
Everything else is kraft paper and card, twine and jute, burlap, needle and thread, white glue, a pen or paint marker, and glass jars with the labels soaked off.
Place Settings for the Table
1. Pressed-leaf place cards. Materials: kraft card cut into rectangles that fold and stand, one pressed leaf per guest, white glue, a fine pen or a white paint marker, twine. Difficulty: easy. Time: about twenty minutes for eight, as an estimate. Fold each rectangle into a tent. Spread a thin layer of glue on the back of a leaf with a scrap of paper, press it onto the front of the card with the stem toward a corner, and hold it flat for a moment. Write the name across the leaf in white marker, or beside it on the kraft, pressing lightly, because a pressed leaf cracks under a heavy pen. Tie a short length of twine around the fold if you want a finished edge.
2. Corn husk napkin ties. Materials: husks from two or three cobs of ornamental corn, a bowl of warm water, a cloth, scissors. Difficulty: easy. Time: about fifteen minutes for eight, as an estimate. Soak the husks until they bend easily and cut each into a strip about two fingers wide. Wrap a strip around the middle of a folded napkin and tie a single knot, leaving the tails long. A narrower second strip tied over the first in a bow adds volume. Let them dry on the napkins; the husks stiffen in the shape they were tied. Tuck a pressed leaf or a sprig of dried grass under the knot on the day.
3. Stitched burlap napkin bands. Materials: burlap, a needle, thread in a contrasting colour, pins, scissors. Difficulty: easy. Time: about ten minutes per band, as an estimate. Cut strips a little wider than the finished band and long enough to wrap a folded napkin with an overlap. Fold each long edge over once, pin it, and run a visible running stitch along both edges in the contrasting thread. Sew the short ends together into a loop. Burlap frays, so the folded, stitched edge is what holds the band together, and the fraying you cannot stop becomes part of the look.
4. Hand-lettered kraft menu cards. Materials: kraft card, a ruler, a pencil, a pen or paint marker, an eraser. Difficulty: easy. Time: about half an hour for the first and less for each after, as an estimate. Cut the card to a size that stands against a glass or lies beside a plate. Rule faint pencil lines, write the courses in your own handwriting, and draw one small leaf outline in a corner. A repeated simple shape looks deliberate where a scene looks like an attempt, and the easy drawing ideas list has several that work at this scale. Rub out the pencil once the ink is dry.
5. Kraft paper gratitude runner. Materials: a roll of plain kraft paper, scissors, a pencil, a dark marker, a jar of pens for the table. Difficulty: easy. Time: about twenty minutes, as an estimate. Unroll the paper down the table, cut it with an overhang at each end, and weight it under the plates. Draw a border of one leaf outline repeated along each edge and write a short heading at one end. Leave the middle empty and put the jar of pens within everyone's reach. During the meal, people write what they are thankful for wherever they like. Afterwards, photograph the runner flat in daylight before it is folded.
Keep the Runner and the Tags Where You Will Find Them
Photos of what people wrote at the table, all behind one address you can share with the people who were there and the ones who could not be.
The Centrepiece and the Gratitude Tree
6. Harvest board with jar candles. Materials: a wooden board or flat tray, two or three glass jars taller than the candles inside them, candles or flameless candles, dried ornamental corn, small gourds, pine cones, a few dried leaves. Difficulty: easy. Time: about fifteen minutes, as an estimate. Candles into the jars first, jars onto the board. Lay the corn and gourds along the board around the jars and fill the gaps with cones and leaves. Everything decorative sits on the board, outside the glass and below the rim, and nothing dry leans against a jar. Keep husks, leaves and cones at least 12 inches (about 30 cm) from any flame, the distance the US Fire Administration gives for keeping candles away from anything that burns: candles in the centre, dry material toward the ends. Light nothing until people are seated, and read the candle section below. If in doubt, use flameless candles and keep everything else the same.
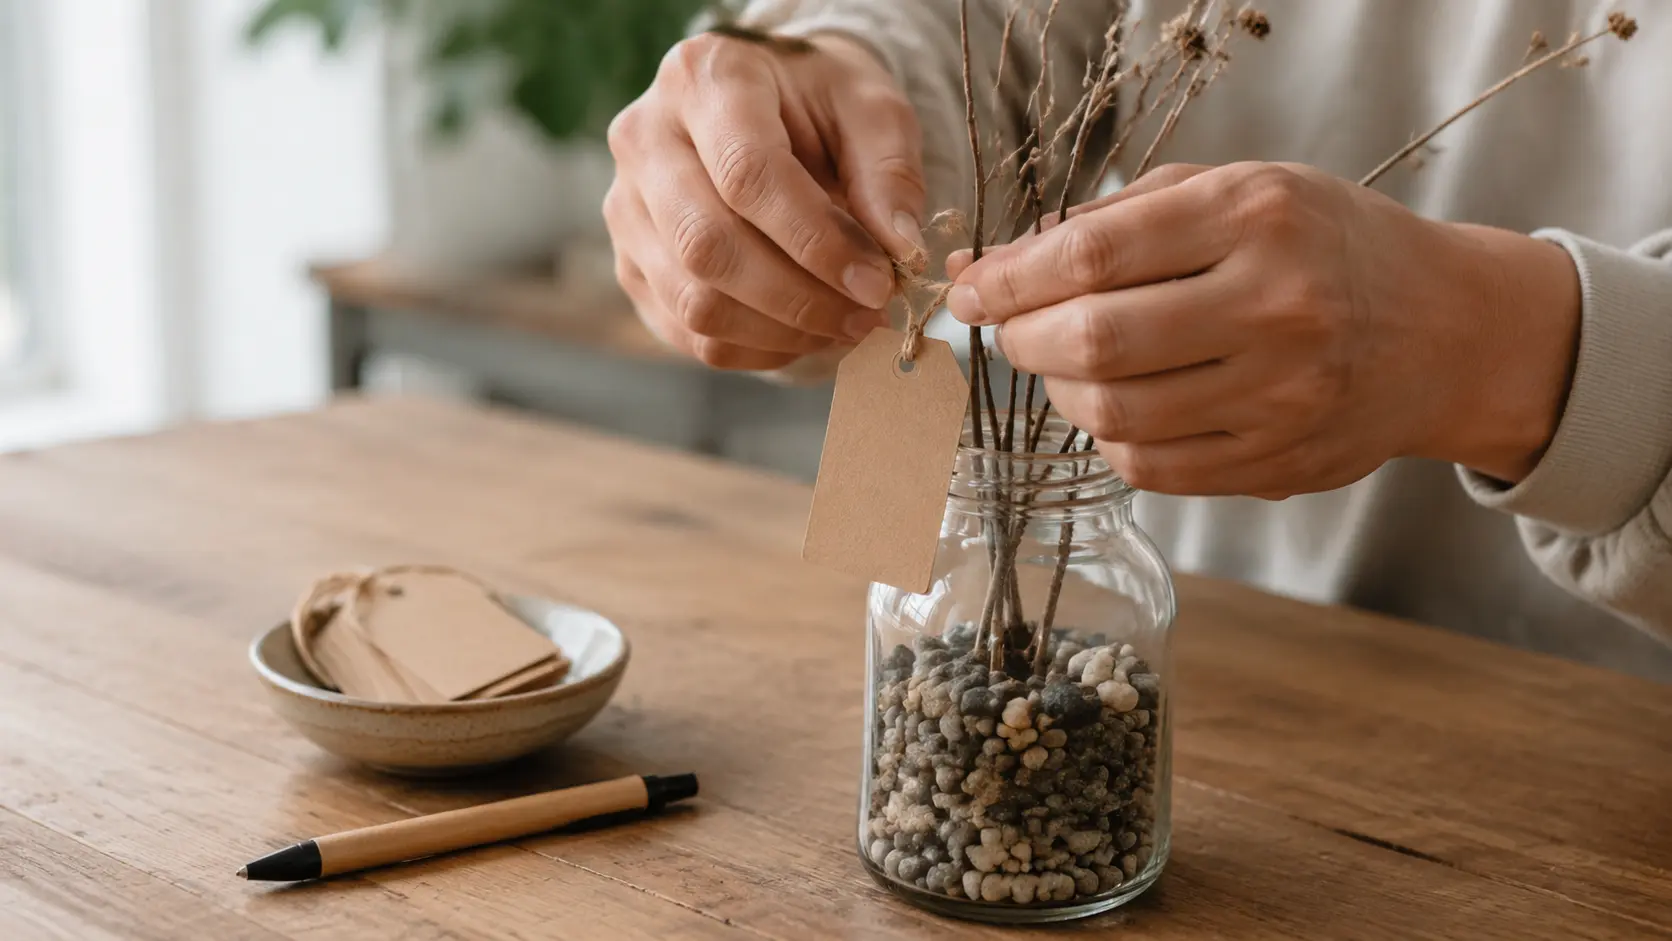
7. Gratitude tree of branches. Materials: three to five dried branches with side shoots, a heavy jar or ceramic pot, pebbles, kraft card, a hole punch or a needle, twine, a pen. Difficulty: easy. Time: about half an hour to build, as an estimate, plus the meal to fill it. Stand the branches in the jar and pack pebbles around the base until they hold upright without leaning on the rim. Cut the card into tags of about the same size, punch a hole near the top of each and thread a loop of twine through. Write nothing in advance. Put the tags in a bowl beside the tree with a pen, and let each guest write one thing they are thankful for and hang it on a branch. Afterwards the tags come off and go in an envelope with the date. Make the tree tall enough to be seen over the dishes; a small one reads as a place setting.
8. Pressed-leaf jar lanterns. Materials: clean glass jars, pressed leaves, white glue thinned with a little water, a soft brush, twine or jute, tealights or flameless tealights. Difficulty: easy. Time: two sessions of about twenty minutes, as an estimate, with drying between. Session one: brush thinned glue onto the outside of the jar where a leaf will sit, press the leaf on, and brush another thin coat over it so the edges lie flat. Repeat with two or three leaves per jar, overlapping slightly, and let it dry completely; the glue turns clear. Session two: tie twine around the neck and trim. The candle sits on the bottom inside the jar, the flame stays well below the rim, and the leaves are on the outside of the glass, which is what makes this a decorated holder rather than a decorated candle. Use jars tall enough that the flame is nowhere near the top, or use flameless tealights, which give the same glow through the leaves.
For the Door and the Entrance
9. Dried corn bundle for the door. Materials: three cobs of dried ornamental corn with husks attached, jute string, a strip of burlap, scissors. Difficulty: easy. Time: about fifteen minutes, as an estimate. Fold the husks back from each cob so they point away from the kernels. Hold the three cobs together with the husks at the top and bind the husks tightly just above the cobs with several turns of jute, knotted at the back. Tie the burlap over the jute in a loose knot with tails. Make a hanging loop from a separate piece of jute around the bound husks and hang the bundle from the knocker or a hook, cobs pointing down. It is a bundle, not a wreath, and it suits a door a wreath would crowd.
Show What You Made
One link for the photos, the how-to and the list of who made what, ready to share with the people who asked for the instructions.
10. Standing sheaf of dried grasses. Materials: an armful of dried grasses, wheat stalks or seed heads of similar length, jute, a wide strip of burlap. Difficulty: easy. Time: about twenty minutes, as an estimate. Gather the stalks with the heads level at the top. Tie them tightly with jute about a third of the way down from the heads. Trim the bottoms level with scissors so the sheaf stands, spreading the base a little so it balances. Wrap the burlap over the jute and tie it at the front. Stand it on the entrance table or the floor by the door. A sheaf stands when the base is flat and slightly wider than the tie; if it leans, tie a second string lower down and trim again.
11. Hand-cut kraft leaf bunting. Materials: kraft paper in one or two shades, a pencil, household scissors, a needle, twine. Difficulty: easy. Time: about forty minutes, as an estimate. Draw one leaf on a scrap of card and cut it out as your pattern. Trace it onto the kraft as many times as you need and cut the leaves out with scissors. Fold each leaf gently down the middle and open it again so it has a spine and catches the light. Thread the needle with twine, push it through the top of each leaf and slide them along the string with a space between. Hang it across the doorway or along a shelf. Two shades of kraft, alternated, read as more than two once they are up.
For the Mantel
12. Beeswax-dipped leaf garland. Materials: pressed leaves with stems, beeswax, a heatproof bowl, a saucepan, baking paper, twine, clothespins. Difficulty: medium, only because of the hot wax. Time: two sessions, as an estimate: pressing over a week or more, then about forty minutes of dipping. Melt the wax in the bowl over a pan of simmering water on low heat. Hold a leaf by the stem, dip it once, quickly, let the excess run back into the bowl for a second, and lay it on the baking paper to set. The thin coating turns a brittle pressed leaf flexible again and holds its colour. Once all are set, tie the stems along a length of twine at regular spacing, or clip them on with clothespins, and hang the garland along the mantel or the front of the sideboard. A dipped leaf is a waxed leaf, so the garland belongs on the shelf, never near the candle board.
Candles, Hot Glue and Scissors
Candles. Two projects hold a flame, and both are designed so the decoration never touches it. The rest comes from fire services. The US Fire Administration's holiday guidance says to keep candles at least 12 inches (about 30 cm) from anything that burns, to use stable holders placed where they cannot be knocked down easily, and to consider battery-operated flameless candles. The London Fire Brigade says never to leave candles unattended, to put them out when you leave the room and especially before bed, to keep them in heat-resistant holders on a stable surface, away from anything that can catch fire such as curtains, papers, furniture and clothes, and out of the reach of children and pets. It also warns that tea lights get very hot and, without proper holders, can melt through plastic surfaces, and it describes flameless LED candles as a much safer alternative. On this list: candles in glass, glass on a board, dry material at the far ends of the table, nothing lit until people are seated, and the last person to leave the room puts them out.
Hot glue. No project here needs it; white glue, twine and stitching do the same jobs more slowly. If you use a glue gun anyway, rest it on its stand, keep a bowl of cold water nearby for a burnt fingertip, keep the nozzle away from dry husks and paper, and unplug it as soon as the last join is done.
Scissors, secateurs, wax and oven. Cut away from your body with the free hand behind the blade, and use secateurs for branches rather than forcing scissors through wood. Beeswax melts only over water, on a low simmer, with someone beside it. Pine cones in the oven are checked, not left.
Which Projects to Make First
The order is set by what needs to dry. Weeks ahead: press the leaves, dry the branches and the grasses, open the pine cones. The week before: the jar lanterns, the beeswax garland, the burlap bands, the bunting, the corn bundle and the sheaf; none depends on fresh material and all of them keep. The day before or the morning of: the place cards and menu cards, so names and courses are final; the corn husk ties, so the napkins are already folded; the runner; the gratitude tree, built empty; the harvest board, assembled last so the candles are the final thing placed.
Keep a note of what you made, what you gathered and what you would change. The tags from the tree, the runner and that note are what you will want next year.
About the date. In the United States, Thanksgiving is a federal holiday on the fourth Thursday of November, a date the National Archives records as fixed by a joint resolution of Congress signed on December 26, 1941. None of the projects depends on it. They are autumn and harvest decoration for a table where people say what they are thankful for, and a household that does not keep the holiday can use every one of them for a harvest dinner.
FAQ
What Thanksgiving crafts can adults make without a cutting machine?
All twelve above, from pressed-leaf place cards and corn husk napkin ties to a gratitude tree, jar lanterns, a dried corn bundle for the door and a beeswax-dipped garland. Nothing needs more than scissors, a needle and a pen.
How do I make a gratitude tree for the table?
Stand dried branches in a heavy jar packed with pebbles, cut kraft card into tags with a twine loop, and leave the tags blank in a bowl with a pen. Each guest writes one thing they are thankful for and hangs it on a branch during the meal.
How do I press leaves so they keep their colour?
Pick them while still flexible, lay them flat between sheets of plain paper inside a heavy book, weight it, and leave them until dry and papery, changing damp paper if needed. A single dip in melted beeswax makes a pressed leaf flexible again and holds the colour.
Can I put candles near dried corn and leaves?
Only with distance and a holder. The US Fire Administration says to keep candles at least 12 inches from anything that burns and in stable holders; the London Fire Brigade says never to leave them unattended and to keep them away from anything that can catch fire. On the harvest board, candles sit in jars in the centre and the dry material at the ends. Flameless candles remove the question.
Do these work if we do not celebrate Thanksgiving?
Yes. Every project is autumn and harvest decoration for a dinner where people say thanks. The holiday itself is a United States date, and nothing here depends on it.
References
- U.S. Fire Administration: Holiday fire safety. Keep candles at least 12 inches from anything that burns, in stable holders placed where they cannot be knocked down easily, and consider battery-operated flameless candles.
- London Fire Brigade: Candles. Never unattended, out before leaving the room or bed, heat-resistant holders on a stable surface, away from anything that can catch fire, tea lights melting plastic, flameless LED candles as a safer alternative.
- U.S. National Archives: Congress Establishes Thanksgiving. The fourth Thursday of November fixed as the federal holiday by the joint resolution signed on December 26, 1941.