

These thirteen Christmas projects are designed for adults making things for their own home or to give away. A wreath for the door, a centrepiece for the table, scented sachets, fabric gift wrap, a small wooden tree. Nothing here is a hanging ornament, and nothing needs a workshop.
Every project lists the materials in generic terms, shows how this guide rates the difficulty, and says whether it fits in one sitting or needs drying time between sessions. The sections on candles, hot glue and blades are there because these are the tools this list actually uses.
One Link for Everything You Make This Season
A short address you control, holding the photos of what you made, the materials list and the notes you want to hand to whoever asks how.
How to Choose One
Pick by the constraint you have, not by the photo you like most.
If you have one evening, choose a single-session project: the candle tray, the napkin rings, the sachets, the pomanders or the fabric wrap.
If the result is a gift, choose something the recipient will use up or use daily: sachets, fabric wrap, a table runner. A decorative object asks the recipient to display it. A sachet asks nothing.
If you want the house to smell of the season, choose the citrus garland, the pomanders or the sachets. All three work without a flame.
If you do not want a glue gun or a blade on the table, the wreath, the twig star, the pomanders, the sachets, the fabric wrap and the macramé tree are all tied, sewn or pushed together, not glued or cut.
| Project | Sessions (this guide's estimate) | Difficulty (this guide's rating) | You end up with |
|---|---|---|---|
| Evergreen wreath on a wire frame | Single session | Medium | A door wreath |
| Twig star for the door | Single session | Easy | A large star, about 40 cm |
| Candle tray centrepiece | Single session | Easy | A centrepiece for the table |
| Dried citrus and cinnamon garland | Two sessions, drying in between | Easy | A garland for the mantel or table |
| Twine napkin rings with rosemary | Single session | Easy | A set of napkin rings |
| Embroidered linen table runner | Multiple sessions | Medium | A runner for the dinner table |
| Cinnamon-wrapped candle holder | Single session | Easy | A decorated glass holder |
| Scented fabric sachets | Single session | Easy | A set of sachets |
| Clove pomanders | Single session, then drying | Easy | A bowl of pomanders |
| Knot-tied fabric gift wrap | Single session | Easy | Reusable wrapping cloths |
| Hand-drawn kraft wrapping | Single session | Easy | Wrapped gifts with a pattern you drew |
| Wooden trees from pine offcuts | Two sessions, finish drying in between | Medium | A set of three small trees |
| Macramé tree for the wall | Single session | Medium | A wall piece on a dowel |
For the Door and the Entrance
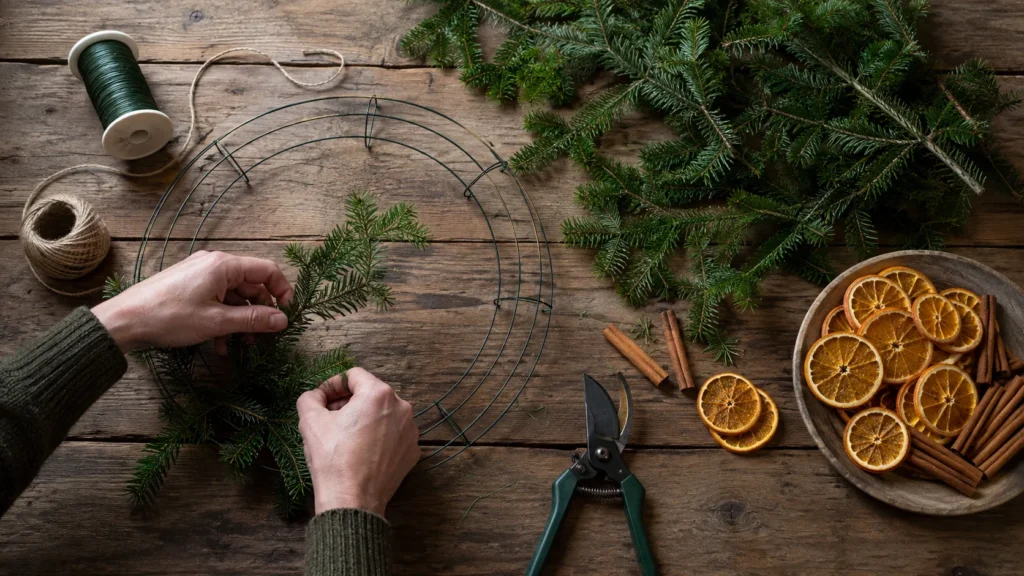
1. Evergreen wreath on a wire frame. Materials: a wire wreath frame, a reel of florist wire, fresh evergreen branches (fir, pine, eucalyptus, bay or whatever grows near you), secateurs, ribbon. Cut the branches into short pieces of roughly the same length. Lay three or four pieces together as one bundle, hold the bundle against the frame with the stems all pointing the same way, and bind the stems to the frame with two tight turns of wire. Do not cut the wire. Lay the next bundle so its tips cover the stems of the first, bind again, and keep going round in the same direction. The last bundle tucks under the tips of the first. Tie the ribbon over the join. Keep every bundle pointing the same way around the circle: this method depends on it, because a bundle facing the other direction leaves a visible gap that no ribbon covers.
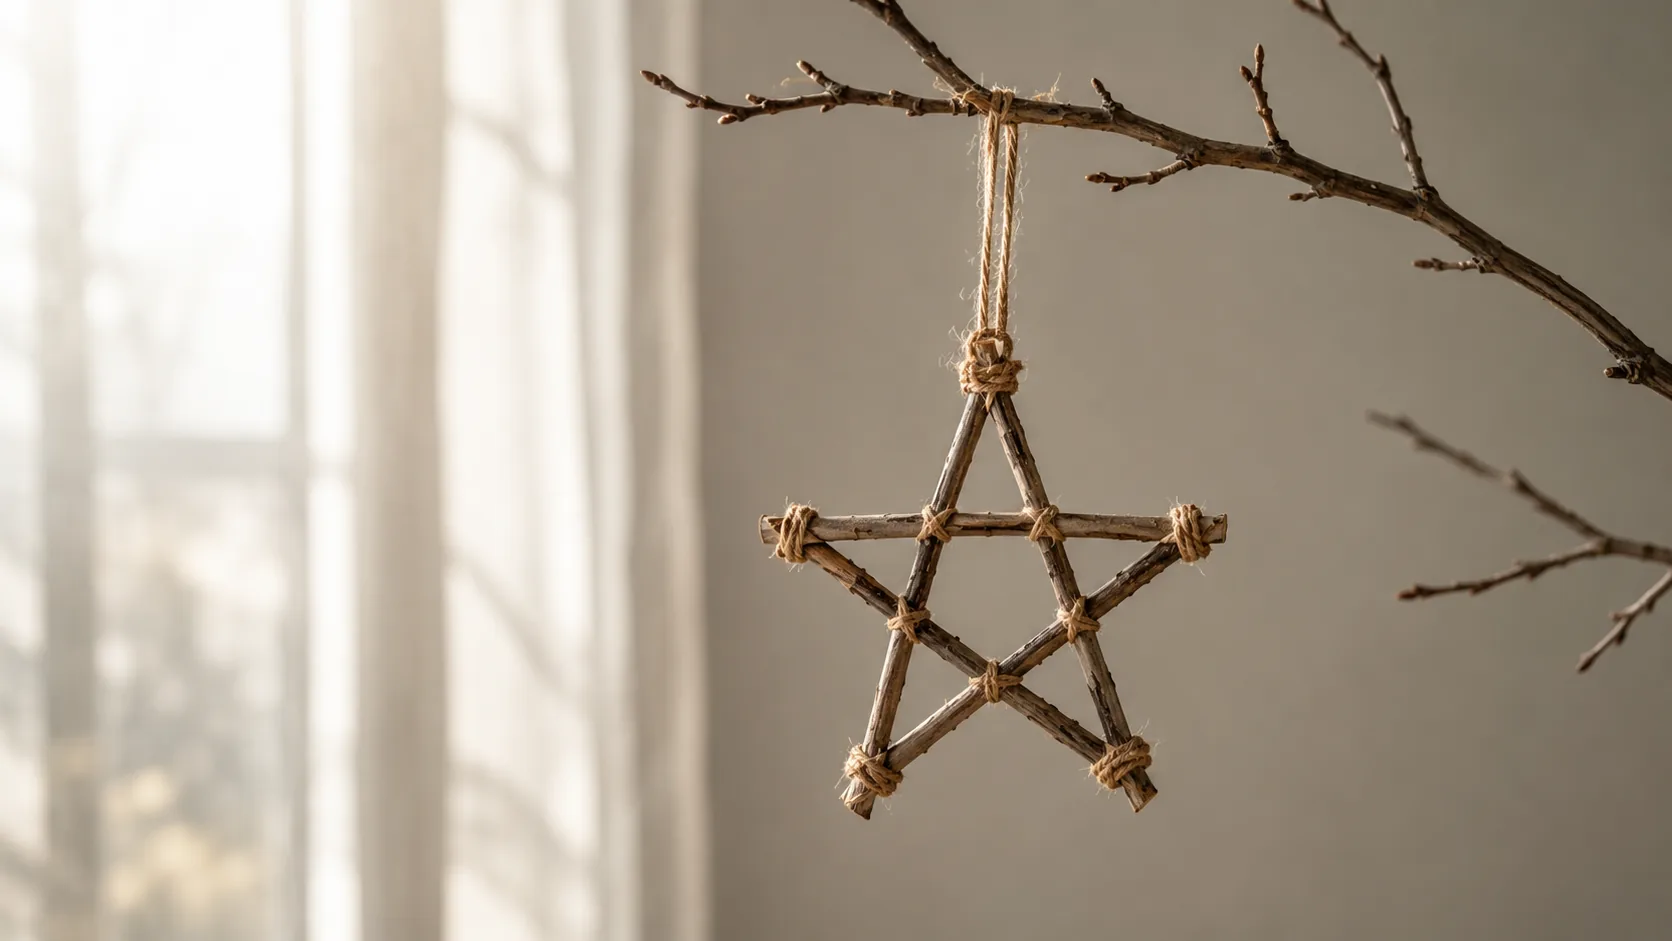
2. Twig star for the door. Materials: five straight twigs or pruned branches of equal length, twine or florist wire, ribbon. Lay the five twigs on the table in a five-pointed star, each twig crossing two others. Bind every crossing point tightly with twine, wrapping in an X pattern so the twigs cannot rotate. Trim the twine ends, or leave them long and tie a ribbon at the top point to hang it from. Make it larger than feels right. On a door, a small star reads as an ornament and a large one reads as the decoration.
For the Table
3. Candle tray centrepiece. Materials: a flat tray or a wooden board, three pillar candles of different heights, three glass holders tall enough to contain each flame, a few sprigs of greenery, dried citrus slices or pine cones. Put the candles in their glass holders first and place them on the tray. Arrange the greenery around the base of the holders, on the tray, and keep it there: nothing goes inside the glass and nothing leans over the top of a holder. Read the candle section below before you light anything on this tray. If the table will be crowded, use flameless candles and keep everything else the same.
4. Dried citrus and cinnamon garland. Materials: oranges or lemons, cinnamon sticks, twine, a large needle, baking paper. Session one: slice the fruit thinly and evenly, pat the slices dry with a cloth, lay them on baking paper on a rack and dry them in a low oven, turning them now and then, until they are leathery and no longer damp to the touch. Follow your oven's guidance for low, long drying and stay in the house while it runs. Session two: thread the needle with twine and push it through the peel of each dried slice, alternating with cinnamon sticks tied on by their middle. Hang it along a mantel or lay it down the centre of the table.
5. Twine napkin rings with rosemary. Materials: a cardboard tube, twine, a sprig of rosemary per ring, white glue. Cut the tube into rings about 4 cm wide. Put a dab of glue at the start, wind the twine around the ring tightly with each turn touching the last, and glue the end down. Tuck a rosemary sprig under the twine on the day. This is the project to make in a batch while something else dries.
6. Embroidered linen table runner. Materials: a length of linen or plain cotton, thread in one contrasting colour, an embroidery needle, a fabric pencil, pins. Cut the runner to the length of your table plus an overhang at each end, fold each edge twice and hem it with a running stitch. Then draw a simple border, a single line one finger's width inside the hem, and stitch along it. If you want a motif, keep it to a small star or a plain tree shape repeated at each end. Work in whatever sessions you have. A runner is the project you leave on the arm of the sofa and pick up.
Candles and Scent
7. Cinnamon-wrapped candle holder. Materials: a straight-sided glass jar, cinnamon sticks of similar length, twine or a wide ribbon, a rubber band. Stand the jar on the table, stretch the rubber band around it, and slide cinnamon sticks upright under the band, side by side, until the glass is covered all the way round. Tie twine or ribbon over the band to hide it. Everything decorative sits on the outside of the glass. The candle goes inside the jar on its own, and the flame stays below the rim, which is what makes this a decorated holder and not a decorated candle. Use a jar tall enough that the flame sits well below the top of the sticks, or use a flameless candle.
8. Scented fabric sachets. Materials: cotton or linen scraps, thread, a needle, dried lavender, dried orange peel, whole cloves, broken cinnamon, twine. Cut two rectangles of fabric, place them right sides together and sew three sides with a small running stitch. Turn the pouch out, fill it with the dried mix, and either sew the top closed or tie it with twine. Make a set of six. These go in drawers, wardrobes or a bowl by the door, and they are the gift on this list that asks nothing of the recipient.
9. Clove pomanders. Materials: firm oranges, whole cloves, a skewer or a thick needle, ribbon. Pierce the peel with the skewer and push a clove into each hole. Cover the fruit in lines, spirals or all over. Tie a ribbon around it as you would a parcel and leave the pomanders in a bowl in a dry, airy place to shrink and harden over the following weeks. They are a table decoration, not a hanging one, so the ribbon is for looks and for lifting.
Before lighting anything. The candle projects above are designed so that the decoration never touches the flame, and the guidance from fire services is specific about the rest. The National Fire Protection Association (NFPA) advises keeping candles at least 12 inches (about 30 cm) from anything that can burn and blowing out all candles before you leave a room or go to bed, and it suggests considering flameless candles in the home. NFPA also notes that Christmas is the peak day for candle fires. The London Fire Brigade advises keeping candles in heat-resistant holders placed on a stable surface, never leaving them unattended, keeping them away from anything that can catch fire such as curtains, papers, furniture and clothes, and keeping all decorations away from naked flames. It also warns that tea lights get very hot and, without proper holders, can melt through plastic surfaces. In practice: glass holders, a tray, greenery outside the glass, and nobody leaves the room with a flame still going.
Keep the Materials List Where You Will Find It Next Year
Photos of the finished table, the list of what you bought and what you would change, all behind one address you can share with whoever is hosting next time.
Gifts and Wrapping
10. Knot-tied fabric gift wrap. Materials: cotton remnants or an old clean sheet, thread, a needle or a sewing machine, fabric scissors. Cut squares of fabric in two or three sizes, fold each edge twice and hem. To wrap, lay the gift diagonally on the square, bring two opposite corners over the top and tie them once, then tie the remaining two corners over the first knot. The cloth is part of the gift, and the recipient can use it again. Make the squares bigger than seems necessary. A square that is barely large enough produces a knot with no tails, and the tails are what make it look finished.
11. Hand-drawn kraft wrapping. Materials: a roll of plain kraft paper, a white paint marker or a white gel pen, twine, a sprig of greenery. Wrap the gift first, then draw straight onto the paper: a repeated star, a row of small trees, a line of dots along each edge. Repeat one shape rather than attempting a scene. If you want a few more shapes you can draw without practice, the easy drawing ideas list has plenty that work at gift-tag scale. Tie with twine and tuck a sprig under the knot.
Wood and Cord
12. Wooden trees from pine offcuts. Materials: a length of planed pine board, a hand saw, a pencil, a ruler, medium and fine sandpaper, wood glue, clamps or a heavy book, a clear finish or paint. Draw three tall triangles of different heights on the board and a short rectangle for each trunk. Clamp the board to the edge of the table and cut along the lines with the hand saw, keeping your free hand behind the blade, never in front of it. Sand every edge until nothing catches your thumb. Glue each trunk to the base of its triangle, clamp, and let the glue set for the time the product states. Finish with paint or a clear coat and let that dry before handling. No power tools are involved in this method, and the saw does all the shaping. Uneven triangles read as handmade. Rough edges read as unfinished, so the sanding is the step not to rush.
13. Macramé tree for the wall. Materials: cotton macramé cord, a wooden dowel or a straight branch, scissors, a comb. Cut an odd number of cords, each far longer than seems reasonable, and mount them on the dowel with a lark's head knot. Work rows of square knots, dropping one knot at each end of every row, so the piece narrows to a point as it goes down. Trim the loose ends into a straight line at the bottom and comb them out into a fringe. Two knots, the lark's head and the square knot, make the whole thing. Measure cord generously, because knotting consumes length quickly and running out near the point means starting again.
Working Safely With Glue, Blades and Flames
Hot glue. This list avoids it where twine or wire does the same job, but if you use a glue gun for the napkin rings or the twig star, follow the tool manufacturer's guidance, rest it on its stand and not on its side, keep a bowl of cold water on the table for a burnt finger, and unplug it as soon as the last join is done.
Blades and saws. A craft knife and a hand saw both cut cleanly only when sharp, so replace a dull blade rather than pressing harder. Cut on a mat or a board, cut away from your body, and keep the hand that is not holding the tool behind the cutting path. For the wooden trees, clamp the board rather than holding it.
Flames. The candle section above carries the fire-service guidance. The design rule across every project here is the same: decoration sits outside the glass and below the flame, never on the candle and never above it.
The oven. Drying citrus is a long, low bake. Stay in the house while it runs and check the slices rather than setting a timer and leaving.
Which Projects to Make First
The order is set by what needs to dry, cure or shrink, and by what looks its best only when fresh.
First: the pomanders, the citrus garland, the wooden trees and the runner. Pomanders harden over weeks, citrus needs its drying session, the trees need glue and finish to dry, and the runner is the slowest sewing on the list.
In the middle: the sachets, the fabric wrap, the kraft wrapping and the macramé tree. None of them depends on fresh material, so they can be made whenever you have an evening.
Last: the wreath, the twig star with fresh greenery, the candle tray and the napkin rings with rosemary. Make anything with fresh branches as close to the day as you can, so it is at its best when people see it.
Keep a note of what you made, what you bought and what ran out. The list is the thing you will want next year, and it is the thing nobody keeps.
Show What You Made
One link for the photos, the how-to and the list of who got what, ready to share with the people who asked for the instructions.
FAQ
What are some Christmas crafts for adults that are not childish?
Projects that produce a finished object for the home or a gift: an evergreen wreath on a wire frame, a candle tray centrepiece, a dried citrus garland, scented sachets, fabric gift wrap, wooden trees cut from pine offcuts, a macramé wall tree. All thirteen above are designed around natural materials and a limited palette.
Which Christmas craft can I finish in one evening?
The candle tray, the twig star, the napkin rings, the sachets, the pomanders, the fabric wrap and the kraft wrapping. The wreath is a single session too, once the branches are cut.
What can I make as a handmade Christmas gift?
Choose something the recipient uses rather than displays: a set of sachets, a set of fabric wrapping cloths, an embroidered table runner. Make sets rather than singles, and finish the edges.
How do I make a Christmas wreath without a glue gun?
Bind small bundles of greenery to a wire frame with florist wire, each bundle covering the stems of the one before, all pointing the same way. No glue is involved in the method above.
Can I decorate a candle with dried orange slices or cinnamon?
Decorate the holder, not the candle. In the projects above, cinnamon sticks are fixed around the outside of a glass jar and greenery sits on the tray, so the flame stays inside the glass and below the rim. NFPA advises keeping candles at least 12 inches from anything that can burn, and the London Fire Brigade advises keeping decorations away from naked flames.